We're taking a day off from cooking to share pics of our other love, dogs!! Who doesn't love dog pictures (cat lovers, maybe??)
Here's my dog, Karma. I've had her 10 years and love her more everyday! When we brought her to Texas, we started shaving her because she got so hot in all her fur. She's such a well-behaved dog, she just naps while we do her 'do!
Another one of Karma and Cody...
And Rooty is our little one. She's a handful, but she has such a fun personality and is super affectionate. She's my shadow, she follows me everywhere!
I hope you enjoyed these as much as I did! Have a great Saturday!
I have a love/hate relationship with meat salads (like chicken salad, tuna salad, etc.). I love tuna and chicken salad, but only if it’s not too goopy and the chicken is chopped small enough and there can’t be any grapes in it (I just don’t get that combo!). So adapting Paula Deen’s Almond Chicken Salad would be great because I can control everything that goes in it!
The worst, or rather unhealthiest, part of chicken salad is the mayonnaise. So to lighten up this version, I swapped out ½ cup of regular mayo for a mixture of light mayo and pureed white beans.
White beans, you ask?? I totally wish I could take credit for this trick but I actually got this idea from one of my favorite cookbooks, The Sneaky Chef (check it out below). I got it a couple of years ago with my food processor and I’ve tried tons of recipes from it and fell in love with the concept. Basically, the author uses fruit, veggie and bean purees in place of high fat ingredients. I’ve made chocolate French toast, blueberry muffins and ice cream that all have these “sneaky” purees in them and they’re delicious!
Back to my chicken salad, I combined all the ingredients and I was done! I packed it for my lunch next day to share with Kat. It was good, but the chicken needed to be diced smaller and it needed a tad more mayo/bean mix to make it more cohesive. I made those adjustments and had it again the next day and it was much better!
Nutritionally, the lightened up version has almost 100 calories less than the original and the fat was reduced by 60%!
Nutritional Information
Nutritional Information
Servings Per Recipe: 6
Servings Per Recipe: 6
Amount Per Serving
Amount Per Serving
Calories: 243
Calories: 165
Fat: 17 g
Fat: 6.7 g
Sodium: 550 mg
Sodium: 149 mg
Fiber: 1 g
Fiber: 1.5 g
What food do you have a love/hate relationship with?
Here’s the recipe!
Fit Chick(en) Salad
2 tbsp lemon juice
2 tbsp light mayo
2 tbsp pureed white beans
2 chicken breasts, cooked and diced
1 c celery, diced
1/3 c slivered almonds
There is something funny about chicken pot pie. I absolutely love to eat them...but for some reason they make me very queasy. It think it comes from me trying to eat a whole pot pie by myself! Mmmmmmm...
Good news is, this one definitely didn't make me sick! I absolutely LOVED the final product. It all started with Paula's Hurry Up Chicken Pot Pie recipe and with a few simple changes turned into one of my favorite recipes.
One of the big changes I made was substituting reduced fat crescent rolls for the biscuit topping. Thought the biscuit would have been thick and fluffy, the crescents did not disappoint! They were flaky and delicious.
On the nutrition side of things, I was able to almost cut the calories in half. The most amazing alteration was the fat content! Almost 30g less than the original! The sodium content was not changed too much, since I still used some canned ingredients. Overall, this dish was very filling, flavorful and a much healthier choice.
Taste: Seconds, Please!
Waist: Tighten Your Belt a Notch!
Crescent Chicken Pot Pie
2 cups chopped, cooked chicken breast 3 hard boiled egg whites, chopped 1 cup very thinly sliced carrots 1 cup frozen green peas 1 (10 ¾ oz) 98% fat free cream of chicken soup 1 cup low fat chicken broth ¼ tsp black pepper 6 refrigerated, reduced fat crescent rolls Canola oil spray
Preheat oven to 350 degrees.
Spray a 2-quart casserole dish with canola spray. Spread the chicken, peas, carrots, and egg whites evenly in the dish. Mix together the soups and pour over the chicken and vegetables. Sprinkle with pepper. Lay the crescent roll dough over the top of the mixture, letting each overlap slightly. Bake until the crescents are golden brown and the mixture is bubbling, approximately 35 minutes.
What’s Up With Morningstar’s Veggie Corn Dogs being MIA for so long??
When Kat told me about these things, I knew I had to try one. Corn dogs make me think of state fairs and junk food, so if there’s a healthy version out there, I want it! I was on the hunt, but couldn’t find them anywhere. I did some Google-ing and it turns out they’ve been discontinued. What a sad day! It turns out the lost dogs were a result of supplier issues and stock shortages, according to their website.
Did I give up my search for a healthy corn dog? No way! I found a recipe so I could make my own. The original recipe called for 2 ingredients: vegetarian hot dogs and refrigerated corn muffins. Sounds easy enough, right? But when I went to the store so I could test these out, the refrigerated corn muffins were no where to be found.
I bought 3 alternatives to test out:
Refrigerated Crescent Rolls – Not really the texture of a corn dog, but I was desperate and they were there.
Polenta – I don’t know what I was thinking here…maybe I thought it looked like corn bread??
Corn Muffin Mix
I vetoed the first two without even trying them and decided to go with the corn muffins. I decided to make a mini version of a corn dog because I didn’t know how to coat the dogs with mix and get it cooked fast enough before the mix oozed off the dogs. And obviously, frying was not an option. I prepared the mix according to the package and used my mom’s mini muffin tin (well, it’s mine now…somehow it ended up in my boxes when I moved to Texas. Sorry, Mom!). It was pretty easy and the Veggie Corn Dog Bites were delish!
It's hard to tell from this picture that they're small, but those are 5 little rounds on a small dessert place. Or saucer. Whatever.
Here’s the Nutritional Info for 1 serving of 5 Veggie Corn Dog Bites:
Nutritional Information
Servings Per Recipe: 4
Amount Per Serving (5 corn dog bites)
Calories: 345
Fat: 13 g
Sodium: 752 mg
Fiber: 0.6 g
It's kind of high in fat and sodium, so this is definitely something to be saved for special occasions, it's not an everyday kind of food!
What’s your long lost food love? I can’t think of a discontinued product that I miss, but lately I’ve been thinking a lot my Dad’s Lemon Cream Puffs. It’s been YEARS since I’ve had it (hint, hint!)!
Here's the recipe:
Veggie Corn Dog Bites
1 box Jiffy Corn Bread mix
1 egg
1/3 cup skim milk
2 Smart Dog vegetarian hot dogs
Preheat oven to 400 degrees
Mix first three ingredients. Cut the hot dogs into small 'dots,' try to get ~10 pieces from each dog.
Scoop just enough mix into bottom of mini muffin tin to cover it. Place a hot dog piece into the center and top with enough batter to cover it.
Bake for 10 minutes and enjoy!
Macaroni and cheese is often a kid’s favorite side dish. Even as an adult, I enjoy a mac and cheese, especially with ketchup! Packaged mac and cheese mixes usually do not provide much nutrition. Though this recipe has quite a different flavor, it provides some great fiber, vegetables and calcium.
What was one of your favorite dishes as a kid?
I was able to find higher fiber pasta and lower fat cheese for this dish. One caveat to using a lower fat cheese is like Laura experienced, it is not the best melting cheese. Luckily this dish was cooked in a Crock Pot and had a little bit longer to melt and combine with the other ingredients.
If you look at Paula’s original recipe, she has this dish cook in a Crock Pot for 3 hours. I typically don’t have 3 hours to let a side dish cook when I get home from work. To make this a friendlier working girl recipe, I tried to cook it on high for only 1 hour. The dish cooked just fine!
One mistake I made when making this was forgetting to cook the cauliflower before I started making the dish. Once I remembered that the cauliflower needed to be prepared, I quickly cut it into tiny pieces, tossed them into a bowl of water and zapped them in the microwave. The cauliflower was softened but not quite cooked. Because of this, the cauliflower did not puree well and the “puree” had a much stronger flavor when it was added to the dish.
Overall, the macaroni and cheese was pretty good. The texture was very unique with the egg…very fluffy. The fluffiness of the egg combined with the creaminess of the cheese and other dairy products made this a delicious macaroni and cheese dish. All I would have done differently to make it superb would be to cut back the cauliflower to ½ a cup and to cook the cauliflower correctly!
Here are the nutrition facts:
Lower Fat Creamy Macaroni and Cheese
2 cups uncooked, whole wheat elbow macaroni 2 tbsp Smart Balance Light 2 ½ cups grated 2% Cheddar cheese ¾ cup egg substitute ½ cup low fat sour cream ½ cup Cheddar cheese soup ½ cup steamed Cauliflower, pureed ¼ tsp salt substitute 1 cup 1% milk ½ tsp dry mustard ½ tsp black pepper
Boil the macaroni in water until tender, about 10 minutes. Drain. In a medium sauce pan, stir cheese and Smart balance over medium heat until cheese melts. In a slow cooker, combine the cheese mixture, egg substitute, sour cream, soup, cauliflower, salt substitute, mustard and pepper, stirring to combine. Add cooked macaroni and stir well. Set slow cooker to high and cook for 1 hour, stirring occasionally.
I picked this recipe because I was getting tired of picking chicken and noodle dishes. When I read over the recipe, I got super excited because it involves setting rosemary on fire! How exotic is that? Nutritionally speaking, Paula Deen's Fired Up Rosemary Salmon isn't that bad to start off with and didn't require much adjusting.
The only difference between my version and the original is I used Smart Balance Light Margarine instead of butter. But the original only uses 1 tablespoon for 10 servings so it's really not much per serving. I used a dash of lemon juice because I already had it and didn't want to make a trip to the store, just to get a couple of lemons.
Once you take the salmon out of the oven, you're supposed to light the 'oven roasted' rosemary on fire and let the ashes fall onto the salmon. Sounds like fun, right? But mine was damp from the lemon juice or the steam and wouldn't catch on fire. So then my BF tried to light and uncooked one, but it wasn't dry enough so it wouldn't catch either. After multiple attempts, I gave up and just ate the salmon as it was. It was okay. It was just lemon-y salmon. Not nearly as exciting as I though a fired up salmon would taste.
Note the still green, unburnt rosemary.
What do you do to bounce back from a bad recipe?
Nutritionally, there's not much difference. The tub margarine provided the same amount of fat, but less saturated fat than butter.
Nutritional Information (OLD)
Nutritional Information (NEW)
Servings Per Recipe: 10
Servings Per Recipe: 10
Amount Per Serving
Amount Per Serving
Calories: 427
Calories: 427
Fat: 19 g
Fat: 19 g
Sodium: 128 mg
Sodium:140 mg
Fiber: 1 g
Fiber: 1 g
My rating:
Taste: No rating (It's hard to judge the taste because my final recipe was missing a main ingredient-the burned rosemary ashes!)
Waist: Tighten the belt a notch (I know it's high in fat, but it's coming from heart healthy sources like salmon and the plant oils in the margarine, so I think it's a good recipe in terms of health)
Here's the recipe:
Try to Light it Rosemary Salmon
1 salmon filet, about 5 lbs
1 tablespoon Smart Balance Margarine
pepper, to taste
2-3 bunches rosemary sprigs
lemon or orange slices
Preheat oven to 350 degrees.
Place the salmon skin side down on tin foil, making sure the pin bones have been removed. Season with butter and pepper. Place the springs of rosemary and lemon slices over the salmon so that they are overlapping and form a tent over the salmon. Wrap each salmon in tin foil and roast 15 minutes, or until the internal temperature reaches 145 degrees. Remove the salmon from the oven and bring to a well ventilated outdoor area. Light the oven dried rosemary on fire over the salmon. Let the ash fall over the salmon, leaving streaks of concentrated rosemary flavor.
Who doesn’t love apple pie? I am a huge fan of fresh baked pies and cobblers. My favorite dessert as a child was my father’s apple cobbler. It was surprisingly simple and so incredibly delicious. All he would do was pour a few cans of pre-made apple pie filling into a casserole dish, top it with a yellow pie crust and put pats of butter all over the cake mix. After baking, the cake mix turned into a scrumptious toasted brown crust. It was the best when I added vanilla ice cream! To say the least that cobbler was not the healthiest dessert.
This Sunday’s sweet recipe is a take on Paula’s Crunch Top Apple Pie. I thought I might try to use a little less sugar and use a whole wheat crust.
I forgot to take a pic of the ingredients because I was cooking dinner and apple pie and got a little distracted. Sorry!
The problem with making a whole wheat crust is that you still have to have to use a fat. I find it hard to make a great pastry crust without a little real butter.
This apple pie ended up being delicious! You could definitely tell that the crust was whole wheat but it didn’t really matter! As far as calories, using 1 ½ pre-made pie crusts would have only added an addition 20 or so calories to the nutritional stats. Pre-made crusts, however, would add a significant amount of sodium.
What are some of your favorite items to cook with that are pre-made?
Here are the stats: Taste: Seconds Please! Waist: I may need to unbutton my pants...
Apple Pie with Whole Wheat Crust
Filling: ¼ cup sugar ½ cup Splenda 1 tsp all purpose flour 2 tsp whole wheat flour 1 heaping tsp cinnamon 3 ½ cups peeled and chopped cooking apples 1 (16 oz) jar unsweetened applesauce ½ lemon, juiced 4 sprays of butter substitute spray
Crust (Makes 2 full crusts): 1 ½ cups all purpose flour ½ cup whole wheat flour 1 cup whole wheat pastry flour 1 tsp baking powder 2 tsp sugar 2 tsp Splenda ¼ cup unsalted butter 6 tbsp Smart Balance, Light 8 tbsp skim milk
For the crust: Sift together all dry ingredients. Cut in the butter and the Smart Balance until the mixture is crumbly. Slowly mix in milk. Stir just until all ingredients are wet. Transfer half of the dough onto a sheet of wax paper. Cover the dough with another sheet of wax paper and roll dough until 1/8” inch thick. Repeat for second half of dough. Using one side of the was paper to help stabilize dough, gently place one pie crust dough in a 9” pie plate, crimping the edges.
For the filling: Mix together all ingredients. Pour on top of the crust. Cut the 2nd pie crust dough into 1” strips. Arrange strips on top of the filling in a lattice formation. You can use a whole or half crust if you choose. Spray top of pie with spray butter. Bake at 425 for 10 minutes. Decrease temperature to 350 degrees and bake for 45 minutes.
We got a request from a loyal reader (Kat's hubby; shout out to Rusty!) to have some kind of rating scale to show just how healthy and delicious our recipes are. We usually have a rough estimate of how healthful something is because we work with nutrition labels everyday, but we also wanted to make sure our readers have a very clear idea of how healthy our recipes are or if they're something you should save for a special occasion.
From now on, we'll be ranking our recipes with our Taste/Waist Scale.
First we'll rank our recipe based on taste: -If the final product is horrible (think Kat's attempt at a meatloaf makeover), it's rating is I'll Pass! -If the final product is just so-so, it's rating is I guess I'll eat it... -If the final product is over-the-moon-amazing, it's rating is Seconds, Please!
Next we'll rate how healthy the recipe make over is (and it's affect on our waistline!): -If our recipe modification doesn't lower the calories, fat or sodium very much (like when I tried to lighten up a recipe for Chicken Sticks), it's rating is Get Out the Sweat Pants! -If our recipe modification is a mild improvement but still high enough to be considered an indulgent food, it's rating is May Need to Unbutton My Pants... -If our recipe modification turns out to be significantly lower in calories, fat or sodium, it's rating is Tighten Your Belt a Notch!
We hope this helps you when your considering testing out one of our recipes! Let us know what you think!
For those of you who have never had Goulash, it's pretty similar to Hamburger Helper. It's just meat, noodles and sauce. It's got a weird name, but it's pretty simple. When my BF asked what I was making for dinner, I told him I was redoing Paula Deen's recipe for Bobby's Goulash, he responded with "It sounds like something I won't like." But, being the trooper he is, he everything I served him!
The first thing I noticed about this recipe was that it called for 3 pounds of ground beef and turkey for 6 servings. That's a lot of meat. I only used 1 lb of lean ground turkey and added some finely diced veggies to take the place of the other 2 pounds of meat. I omitted the added salt and in the future I would probably get the low sodium versions of the tomato sauce and diced tomatoes. I used the same elbow macaroni that I've used in the past that has a little bit more protein, although it's not whole wheat. I cut the water in half because all the sauce, meat, veggies and 3 cups of water wouldn't fit it my pot.
The final product was OK. I felt like it was a little over-spiced, but that could be because I significantly reduced the quantity of meat and decreased the water. The recipe also makes a lot! It's written to serve 6, but I probably have enough leftovers to last several days.
Nutritionally, the lightened version was a little bit lighter in terms of calories. One serving is close to 500 calories, but that serving is huge! It's also pretty high in sodium, which is why I'd recommend a switch to low or reduced sodium tomatoes.
Nutritional Information (OLD)
Nutritional Information (NEW)
Servings Per Recipe: 6
Servings Per Recipe: 6
Amount Per Serving
Amount Per Serving
Calories: 748
Calories: 456
Fat: 42 g
Fat: 7 g
Sodium: 2271 mg*
Sodium:1408 mg
Fiber: 6.5 g
Fiber: 8.6 g
*Do you see how the original recipe has ~2200 mg Na (which is just about what dietitians recommend you consume in a whole day)? When I was calculating the recipe in SparkRecipes, I couldn't find an entry for Italian seasoning (the brand I used had 0 mg of Na) or seasoning salt (which I omitted in my recipe), so I left it out of both recipe calculations. So the original is probably even higher in sodium than I could calculate!
How do you cut sodium from your favorite recipes?
Meat and Veggie Goulash
1# lean ground beef/turkey
1/3 c diced celery
1/3 c diced carrots
1/3 c diced bell pepper
2 large onions, chopped
1 1/2 c water
1 (29 oz) can tomato sauce (look for reduced sodium, if available)
2 (15 oz) can diced tomatoes (look for reduced sodium, if available)
3 cloves garlic, minced
2 tbsp Italian seasoning (no salt added)
3 bay leaves
3 tbsp light soy sauce
1/4 tbsp black pepper
1/4 tbsp garlic powder
2 c dried elbow macaroni (I used Barilla)
Cook the beef or turkey in a large pot until no longer pink. Rinse off any grease. Add the diced veggies and saute until tender. Add the water, tomato sauce, diced tomatoes, garlic, and all the seasonings. Stir well. Place a lid on the pot and allow to cook for 20 minutes.
Add the elbow macaroni and return the lid. Continue to simmer for 10 to 15 minutes. Remove the lid, turn off the heat and allow the mixture to sit for 15 minutes before serving. Don't forget to remove the bay leaves!
Are you tired of mac and cheese yet? I guess Laura and I love cheese and pasta so much, we keep choosing similar recipes! Today's recipe is a modification on Paula's Cheese Noodles. The recipe sounded super yummy and wasn't quite like mac and cheese so I thought I would give it a try.
There weren't too many strange ingredients in this recipe. I am a huge fan of the texture of egg noodles, so I was excited to make this dish.
The end result of this recipe looked very delicious. You have the oh so yummy egg noodles with this crispy and toasted brown crust on top. The flavor did not disappoint either! There was a beautiful hint of onion in every bite that finished with the creaminess of the different dairy products.
On the plate, on my new place mats!
A little closer...
On a side note, my hubby HATES cottage cheese. I didn't tell him there was any in here and he actually ate it! He wasn't too pleased when I gave him the news. Either way, this side dish was pretty good. As far as the nutrition value a whole lot didn't change. It is at least a little better.
Is there anything you wish you could sneak into a meal?
Here are the facts
and the new recipe:
Cheesy Noodles
Ingredients: 1 cup 1% Cottage cheese ½ cup low fat sour cream ¾ grated onion 1 tsp Worcestershire sauce ½ tsp garlic powder 6 oz No Yolk egg noodles, cooked ¾ cup grated Parmesan Canola oil spray
In a saucepan, melt the cottage cheese and sour cream together until smooth. Add the rest of the ingredients except the Parmesan cheese and stir to coat. Put mixture in a 2-quart casserole dish sprayed with Canola oil. Sprinkle Parmesan cheese over the mixture. Bake for 45 minutes.
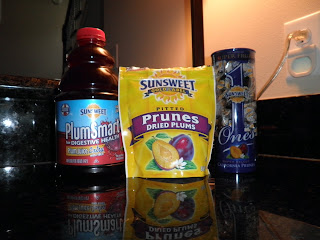
Before I was a dietitian, prunes only brought thoughts of my grandmother in her retirement home. Now, in my mind, prunes have many more redeeming factors including a delicious taste, fiber and antioxidants.
I don’t know if y’all have noticed the change in labeling for prunes. Back in 2000 a new movement was made to change the name to “dried plums.” I guess manufacturers assumed that a new name would help get younger folks to accept the fruit. I am not sure if it actually worked. In my mind no matter what it is called it still looks like a prune when you eat it. I think a social stigma still exists that keeps younger generations from pulling out their snack baggies full of prunes at the lunch table.
In a clinical setting, prunes make me think of keeping your GI tract moving. I have always assumed that it was the dietary fiber that helped prevent constipation. In fact, each dried prune only has 0.6g fiber. For a female to meet her recommended 25g of fiber each day, she would have to eat 42 prunes!! Let’s hope nobody tries to do that because prunes don’t just have fiber, they also have a natural laxative called dihydrophenylisatin.
In moderation, prunes can be wonderful snacks that can be beneficial for GI health. Below are a few of the prune products I found in my local grocery store. On the Sunsweet website I noticed that they have come out with 60 calorie packs of prunes. That would be a yummy sweet treat to pack with a lunch!
What is a food that you love that people might find strange?
Here is a recipe I came up with for Oatmeal Prune cookies. The nutmeg in this recipe gives these cookies a very Christmas time flavor. They would be perfect paired with a small glass of light egg nog. If you are not much for the “Fall” flavor of these cookies you can always omit the nutmeg and increase the cinnamon a bit. Enjoy!
Oatmeal Prune Cookies ½ cup Smart Balance Light, softened 2 tbsp canola oil ¼ cup low fat buttermilk ½ white sugar ½ cup Splenda ½ cup Splenda Brown Sugar Mix, packed, plus extra for dipping ½ cup egg substitute 1 tsp vanilla extract 1 cup white flour 1 cup wheat flour 1 tsp baking soda 1 tsp baking powder 1 tsp cinnamon 1 tsp nutmeg 3 cups quick cooking oats ½ cup diced prunes ½ cup golden raisins
In a large bowl, cream together the Smart Balance, oil, buttermilk and sugars. Slowly add egg substitute and blend well. Stir in vanilla.
Sift together the flours, baking soda, baking powder, cinnamon and nutmeg. Slowly add the flour mixture to the creamed mixture, just until mixed. Slowly stir in oatmeal. Gently mix in the prunes and raisins.
Preheat the oven to 375 degrees F. Put silicone baking mats on cookie sheets. Using a tablespoon, scoop out servings of dough and put them about 2 inches apart on the cookie sheet. Gently flatten each cookie with a fork dipped in the brown sugar.
Bake for 8-10 minutes or until the edges are toasted brown. Allow cookies to cool 1-2 minutes on the baking sheet before transferring to a wire rack to cool completely.
Second to butter, I think shrimp may be Paula’s favorite food! Out of all of the recipes that Laura printed off, at least one quarter to one half are shrimp recipes. Laura is not a huge fan of shrimp and I am not a huge fan of salmon, therefore we divided up the recipes accordingly. This means that my family will be having shrimp at least once a week! I am not completely opposed to shrimp; I would just say that I do not cook it at home very often.
Today’s seafood fare is a second Shrimp Sandwich. Instead of having pan fried whole shrimp like our revised Shrimp Sandwich a few weeks ago; this one has more of a tuna salad like texture.
One mistake I made with this sandwich was over pulsing in the food processor. I couldn’t tell if it was evenly chopped or not so I gave the shrimp a few extra spins. That was a very bad choice. I ended up with more of a shrimp paste than shrimp “crumbles.”
I didn’t have lettuce or tomatoes handy so this final picture is lacking the color of fresh veggies.
Overall, the flavor was pretty delicious and made for a great sandwich on the road. This sandwich was good dose of protein and fiber but not too heavy for our trip to the pool. I would definitely recommend this very easy sandwich, just be careful with the shrimp!
Here is the breakdown:
Shrimp Salad Whole Wheat Sandwich 1 pound cooked and de-veined shrimp 3 hard boiled egg whites, chopped 1 hard boiled egg yolk, chopped 2 celery stalks, finely minced ½ cup light mayonnaise ¼ tsp onion powder ¼ tsp salt substitute ¼ tsp black pepper 8 slices, toasted, Nature’s Own Double Fiber Bread Lettuce and tomato slices
Put the cold cooked shrimp in a food processor. Pulse until just finely chopped (Do not over process!). In a medium bowl, mix together shrimp, eggs, celery, mayo and seasonings. Divide the shrimp mixture between 4 sandwiches. Top shrimp mixture with slices of tomato and lettuce. Enjoy!
If I were Paula Deen and I had some leftover Mac & Cheese, what would I do? I know, fry it! Kat and I saw a video clip of Paula Deen making The Lady's Fried Mac and we were fascinated. I think we both started sizing each other up, just in case we had to arm wrestle to see who would be the lucky one to take that recipe. As fate would have it, I already had The Lady's Cheesy Mac recipe in my pile, so I won this one!
It looked like it was a delicious recipe, but inherently unhealthy. It's mac and cheese (lots of fat), wrapped in bacon (more fat) and then deep fried in oil (eeek!). I used my lightened up version of Mmm...Mac & Cheese, swapped the bacon with turkey bacon, omitted the yolks of the eggs, and made my own whole wheat bread crumbs.
I had a couple of options other than frying. I could try to bake it, but I've didn't know that I would be able to achieve the crunchy texture I was hoping for. I've tried numerous 'oven fried' recipes and while they're good, they're not crispy. I could also pan fry it, which I know would make it crispy, but would also contribute extra calories. Eventually, pan frying won (It's what Paula would have wanted, right!). I only used enough oil to cover the bottom and flipped each side when it got brown.
The final product:
Oh. My. God. These were amazing. I had no words.
Once I composed myself, I was instantly worried that there would be a loud knock and the door and someone would come in and take away my dietitian credentials because I had fallen in love with Fried Macaroni and Cheese. I wanted to marry these golden cubes of cheesy, bacon-y goodness. My only hope was that the nutritional stats would save my hiney. Literally.
And...
Nutritional Information (OLD)
Nutritional Information (NEW)
Servings Per Recipe: 15
Servings Per Recipe: 15
Amount Per Serving
Amount Per Serving
Calories: 333
Calories: 268
Fat: 33.8 g
Fat: 17.1 g
Sodium: 737 mg
Sodium:498 mg
Fiber: 1 g
Fiber: 1 g
(Whew). These guys are not something you want to have too often and when you do have them, you really have to watch your portion sizes and limit yourselves. But if Fried Mac & Cheese is what you're craving and nothing else will do, this recipe will save you a few calories and a little bit of fat.
A quick comment on the stats before I share my recipe: I don't know how much fat is really absorbed when you deep fry something, so I just assumed both recipes absorbed the same amount of fat. I suspect less oil would be soaked up with pan frying, but since I don't know how much I calculated both recipes with the same amount of oil.
What's one of your favorite foods that you would like to see Paula Deen fry??
Fried (For Real!) Mac & Cheese
1 Recipie Mmm...Mac & Cheese, chilled and cut into 15 pieces
1 lb turkey bacon
whole wheat flour (for dusting)
3 egg whites, beaten
3 slices whole wheat bread, toasted and ground into crumbs (OR store bought bread crumbs)
1/2 c canola oil
Wrap each square with turkey bacon and use a toothpick to hold into place. Dust each square with flour and then dip in egg whites. Coat with bread crumbs. Place squares into pan with oil and cook each side until golden brown, about 1 minute. Repeat until each side is cooked. Don't forget to remove the toothpick before enjoying!
I have been looking forward to Sunday all week! I've had this little number in my FNF file and have been counting down daily to this dessert. I picked The Lady's Peach Shortcake because it has fruit in it and my BF tends to prefer desserts that are fruit based and less heavy. BTW, isn't it ironic that Kat and I both have significant others that don't LOVE sweets the way we do? (Sigh) I guess it's a good thing, as Kat pointed out last week, otherwise we'd end up having dessert way too often.
I used Bisquick's Heart Smart Baking Mix instead of the regular kind. The only difference is the Heart Smart mix has no saturated or trans fat it. They're pretty comparable in terms of sodium. I subbed Splenda for all the sugar (the original recipe uses a total of 2 1/2 cups!) and opted to use Fat Free Whip Cream. I calculated the recipe with the frozen kind because I prefer it (it seems a little thicker to me), but I already and the spray-able version in my fridge. Also, the original also uses vanilla ice cream as a topping, but I chose to leave it out of both recipe calculations because it felt like too much, even for Paula Deen (shortcakes, sugary fruit, whipped cream and ice cream?)
I couldn't find the Fruit Fresh preservative anywhere! I had never even heard of it, so Kat had to explain is just something that's sprinkled on to keep the peaches from turning brown. Since I couldn't find it, I just made sure to do the peach part just before serving.
The final product was really tasty! I cut mine so I had 3 pieces and had an 'open-faced' short cake. The shortcakes are best warm. They tend to be a tad dry when cold, as I found out after having one as a midnight snack. I loved the almond-y smell. Why don't I used that stuff more often?!
Here's how the nutrition compares:
Nutritional Information (OLD)
Nutritional Information (NEW)
Servings Per Recipe: 12
Servings Per Recipe: 12
Amount Per Serving
Amount Per Serving
Calories: 526
Calories: 224
Fat: 22 g
Fat: 6 g
Sodium: 487 mg
Sodium:357 mg
Fiber: 2 g
Fiber: 1 g
Not too shabby! The lightened version is half the calories of the original has almost 75% fewer grams of fat. Can you imagine how much more ice cream would have added? Crazy!
I am super pleased with how these guys turned out! I will definitely be making these again.
What's your favorite dessert?
Short on Calories Shortcake with Peaches
Shortcakes:
4 c. Heart Healthy Bisquick Mix
1/2 c Splenda
1 1/2 c skim milk
2 tbsp melted tub margarine
1 1/2 tsp almond extract
Peaches:
6 Peaches
Splash of Warm Water
1 1/2 c. Splenda
Whipped Cream:
3 c Fat Free frozen whipped topping
Combine shortbread ingredients and mix until moistened. Fill into 12 greased muffin tins and bake for 15-20 minutes. Allow to cool for a few minutes and then remove from pan.
Core the peaches and put in a bowl. Add Fresh Fruit perservative (if you can find it). Moisten with warm water. Mix in Splenda until all peaches are coated.
To assemble, split warm shortcakes in half. Place one half on a plate and then top with peaches. Top peaches with second half of shortcake. Top with 1/4 c. whipped topping.
Remember the (Wheat) Germy Chicken Strips I made a couple of days ago?? Anyone remember the Mac and Cheese that sat next to the strips?
Well, I was feeling particularly ambitious that day and decided to re-work TWO recipes in one day! I worked on Italian Chicken Sticks AND The Lady's Cheesy Mac; it was a two-fer!
(Sorry about the picture; I guess my shutter wasn't completely open when I snapped the picture!)
For this recipe, I made adjustments to almost every ingredient. I used a brand I've only used a couple of times for my macaroni. It's not whole wheat pasta, so it has semolina flour, but it also has a blend of legume and other flours in it (lentil, flax, barley). I like it because it's a little higher in protein and fiber than regular pasta. It also doesn't have the tough gummy texture of whole wheat pasta. I used my homemade Greek yogurt from earlier this week, reduced fat cheddar cheese and only used 1 whole egg and 2 egg whites.
Reduced and low-fat cheeses don't melt as well as full-fat cheese, so the final product didn't have that homogeneous, orange-y color that regular Mac & Cheese has. It didn't taste like the heavier version, but it was tasty enough to satisfy my craving. But that's okay, because I have plans for these leftovers (insert evil laughter here)!
The revised recipe is almost 100 calories less than the original and 10 grams less of fat. Here are the stats:
Nutritional Information (OLD)
Nutritional Information (NEW)
Servings Per Recipe: 8
Servings Per Recipe: 8
Amount Per Serving
Amount Per Serving
Calories: 333
Calories: 235
Fat: 20.5 g
Fat: 9.7 g
Sodium: 369 mg
Sodium:285 mg
Fiber: 1 g
Fiber: 1 g
And the recipe:
Mmm...Mac & Cheese
4 c cooked elbow macaroni, drained
2 c shredded, reduced fat cheddar cheese
1 whole egg plus 2 egg whites
1/2 c plain, fat free Greek yogurt
4 tbsp margarine
1 c fat free milk
Preheat the oven to 350 degrees.
When the macaroni is done cooking and has been drained, return to the pot and add the cheddar cheese. Mix the rest of the ingredients in a separate bowl before adding to the macaroni and cheese. When all ingredients have been combined and well-dispersed within the macaroni, pour into a casserole dish or an 8" X "8 square pan. Bake for 30 to 35 minutes. Let sit 5 minutes before serving.


 Taste: Seconds, Please!